Google

Wednesday, May 13, 2020

The makings of a New Purse

It's been so long since I've been on this blog  I'm not sure I even remember how to post.
Since the quarantine I've gotten interested in pop tabs again.  I just finished this bag after about 10 years. 

bottom of bag

I want nothing more than to give you instructions on how to make this bag/very large purse but I don't know that I remember how to publish.  Therefore I'm using this page as a practice.  I'm just trying to make sure it can be seen on the internet and found by others before I go to all the work with the instructions.
I'll leave this here for some time to see if I get any comments of interest for the instructions.  I thought nobody was interested in my blogs and just realized after all these years that the comment sections was set incorrectly. 

Thursday, August 4, 2011

HOW TO MAKE THE STRIPS FOR DUCT TAPE PURSE

Tear a piece of duct tape approximaely 21 inch and lay across a straight edge ruler 3/4 inch along one edge.  Turn the ruler over so the sticky side of the tape is facing up (as per the photo)
Take the loose edge and fold up to the ruler.

Now the the tape off the ruler.

 Now fold the sticky edge over so your piece measures about 1 inch. 

Monday, December 7, 2009

Square Bottom Red Purse.


Some one asked for additional directions for how I made this purse........Here are a few pointers to get you started.
  1. Use crochet hook G
  2. I used the #18 Nylon in Red
  3. chain 42
  4. SC in 2nd chain from the hook and in next 40 SC
  5. Repeat 21 times  - turn- 22 total rows of SC - this will get you the square base for the purse.  
  6. Row 23 - 1 sc in 1st sc, add 1 tab with 2 sc in tab and next 2 SC., SC in next SC. Add another tab.  Evenly space 13 tabs along on side with 2 sc in each tab. You will have 13 tabs for the front and back of purse.
  7. For each side you will need 7 tabs evenly spaced.
  8. Once you have the bottom row of tabs crocheted on, you will then make the front panel, each side panel and then the back panel.  I made this purse doing individual sides and then SC the panels together.  
  9. Each purse row is 16 tabs high.     

Friday, November 6, 2009

This is how I finished the bottom of my purse.

First let me start out again by saying there is no right or wrong way to finish the bottom of your purse.  This is just how I did the bottom of my first purse but I don't know it is how I will do the bottom of my next purse.
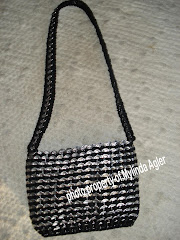
This purse finished 8" wide by 6" tall, It's the perfect size for an evening bag.  The purse is 13 tabs high by 30 tab rows around. 
Once you get the body of the bag crocheted you will have basically a big circle of tags with an opening at the top and bottom. 
Bring one end tog together and begin crocheting tabs along one side.  2SC in each tab hole.


I put on 13 tabs across the bottom of my purse.  If you want the bottom of your purse to be a little wider, now is the time to add 1 or 2 more tabs across the bottom.  Mine purse is about 1 1/2 inches smaller at the bottom than the opening at the top.

Once I crochet 13 tabs along one side, I did 2 SC in each hole of the tab at the end.  This allows you to turn the corner and crochet the other side of the tab to the other side of the purse.  see photo.

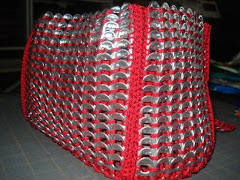
I only have one single row of tabs on the bottom of my purse.
After I got the row of tabs on I had to do something to hole the tabs together I just came along the center of the tabs and did a single crochet to hold everthing together.  I did not put a lining in my purse.

Next you need crocheted on a handle.  Begin by tieing your yarn on one side of your purse, where you want your handle to be.  Crochet a single row of tabs for your handle.   2 sc in each tab hole along side adding tabs as you go.  My handle is 59 tabs long.  When you have the handle as long as you want it to be then crochet to the other side of your purse.  Finish by crocheting down the other side of the handle.  Your handle will look like the picture below when it is finished. 

close up of handle attached to purse

Your purse handle will look like the picture above when it's completely finished.

Friday, April 24, 2009

The Beginning of the Purse

Thank you so much for the interest in the instructions to make the pop tab purse. 
On my first purse I used a nylon thread #18 that is used for macrame. It's very slick and hard to work with. It made a great purse but then I used black yarn and it looks the same it's just holds the stitch tighter.

I also learnt that I don't know how to tie off the nylon thread. Every knot I made slips back out. So I burnt the end of the thread like someone suggested but how is that going to hold my stitch. It did keep the end of the thread from fraying. So........I thought I would melt the threads together to tie my stitch off........yep.......I melted the thread clean off and still didn't hold my stitch, lol..
 I finally tied a knot and carefully melted the yarm to keep the knot in place. 

From what I've learnt, there is really no right or wrong. If you do a few stitches and it doesn't look or feel right, try something else.
There is also two different looks that you can achieve by the way you lay the tabs on each other. When you start the row you need to decide which look you want.

Big side of tab laying over each other

Small side of tabs laying over each other
Use whatever look you like best or you will have a boo boo in your purse like I do. See the strip in my purse that I got the tabs going the wrong direction. I didn't change it at the time because I thought I would never finish the purse anyway and who cared but me, but I did finish and now have a mistake. I've made others after this and I still get them going the wrong direction. You just pull your work out and start again.

1. Take your first two tabs, right sides together and tie your yarn into one of the holes.

2. Insert your hook through the center of the tab where you tied your yarn and draw up a loop.

3. Make 2 Single crochet (SC) in same hole. Chain 1.
If you use the nylon, do not chain one after the two sc. The reason is.....The nylon is so loose you don't need that extra thread. If you use yarn your stitches will be to tight so you have to chain 1 after the 2 sc in a tab hole.
4. Open the two tabs up and decide what look you want, If you want to see the big part of the tabs when you are finished, lay the second tab on top of the first tab.
If you want the smaller part of the tab to show when you are finished, lay the second tab under the first.

5. Bring the tabs together, right sides facing each other. 2 sc in the next hole, chain 1.
6. Open these pieces so you see what it's going to look like. Once you get the hang of it, you won't have to open each row to see how to add the next two tabs.

7. Continue adding tabs following step 5 until you have 13 in a row. My purse 13 tabs high measures about 6 inches high. This was a great size for a night out on the town as an evening bag but not a good "go to the grocery store, mommy size". If you want it to be taller, now is the time to add more tabs.
8. When you have your row as long as you want, 2 SC in the holes of the last two tabs.
9. chain 2, then open the first two row. Your work should be in the position like the photo to add the next row of tabs.


10. Lay your next tab beside the ending tab.


10. Put the two tabs together with right sides or smooth sides together, matching tab shapes. Insert hook into both tabs at the same time and crochet 2 SC.

You will always be facing tabs together to crochet and then opening up when you have a finished to see the results and start the next row.
11. Add your next tab on, continueing your pattern. For my row and pattern, the tab will be added on the outside of the tab. see photo


12. Put the tabs together and crochet 2 SC in tab holes.
13. Continue adding tabs to complete this row. When your get to the end of the row, chain 2, turn and add your next row in the same manner as you have been.
14. My purse was 30 rows wide.
15.  Once you have added all your rows, which is how wide your purse will be,  bring the beginning & the ending of the purse together, with right sides facing each other.  Continue crocheting the two tabs together just like you've been crocheting.  Only crochet about 5 tabs and then turn the bag right side out.  You will now be working from the inside of the bag.  Continue to crochet the rest of the way up the side of the bag.  This takes a little patients as it's hard to work your hook on the inside of the bag in such a small place......Always remember, you will only be doing this once. 
At this point you will have the body of the bag done. 

Monday, January 5, 2009

About a year ago I made a blog page to make the chip wrapper purse. I've had such positive feedback from that page that I decided to make a sister page of how to make a pop tab purse.

I've posted the first pictures of my purse that I made from pop tabs. I will begin the step by step tutorial soon!!!!!

YOU WILL HAVE TO KNOW HOW TO CROCHET TO MAKE THIS PURSE